
Adaptive Layer Height: how I got a smooth surface on an angled model
On a recent project the top of the model was angled. Without adaptive layer height the surface would have been stepped and rough — here's how I solved it and why the technique works.
PROJECT
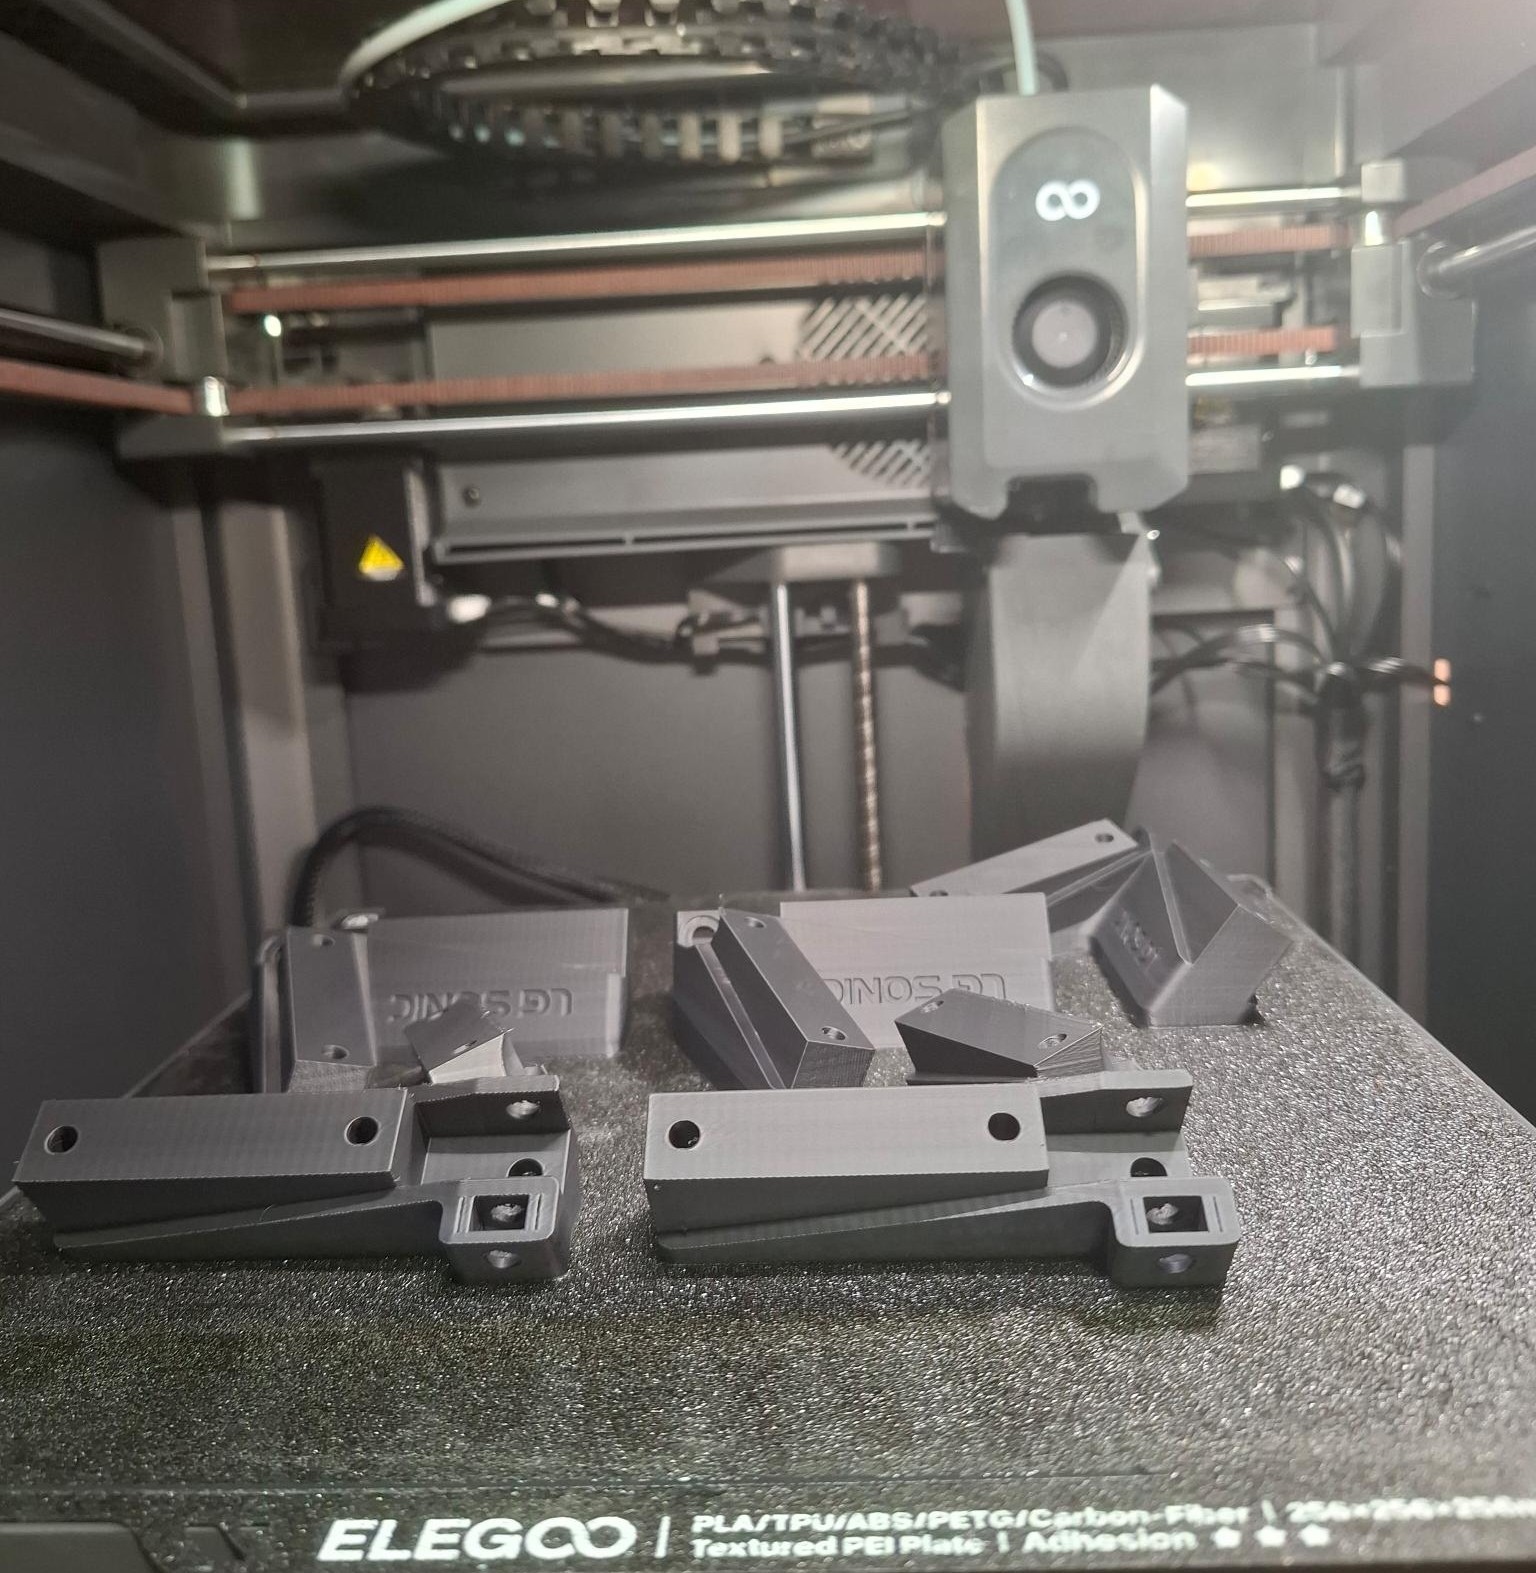
This week I printed a batch of holders for LG Sonic sensors (photo above — Elegoo Centauri Carbon, ASA by Crofil). Sounds simple: a boxy bracket with screw holes. But the top of each part had a slight bevel — a few degrees of slope, functionally important because it seats on a curved housing.
If I had run the standard fixed layer height of 0.2 mm, that slope would have come out as a classic "step ladder" surface: visible steps, rough to the touch, ugly to the eye. The solution is adaptive layer height.
WHAT ADAPTIVE LAYER HEIGHT IS
Instead of the whole print running at a single layer thickness, the slicer analyses the model geometry and varies the layer thickness across the build:
- Where the geometry is steep or vertical (e.g. side walls), it uses thicker layers — 0.24 to 0.32 mm. Fast, good enough, no one sees it.
- Where the surface is near horizontal or at a shallow angle (bevels, domes, fillets), it drops to a thin layer — 0.08 to 0.12 mm. Slower, but the steps become small enough that neither eye nor finger picks them up.
The math behind it: the "step" size on a slope is layer_height / tan(angle to horizontal). At a 10° bevel, with a 0.2 mm layer the step is about 1.13 mm — rough. With a 0.1 mm layer it drops to 0.57 mm. At 0.08 mm it falls under 0.5 mm and blends optically.
SETTINGS I USED
In PrusaSlicer (the same principle applies in OrcaSlicer, Cura, Bambu Studio):
- Base layer height: 0.2 mm
- Minimum layer height: 0.08 mm
- Maximum layer height: 0.28 mm
- Adaptive quality: 75%
- Smoothing: on (so thickness changes gradually, not in jumps)
Result on this project: the angled top surface came out visibly smoother than the side walls, even though the print was faster than if I had done the whole thing at 0.1 mm.
WHEN IT MAKES SENSE, AND WHEN IT DOESN''T
Adaptive layer height pays off when:
- The model has bevels, domes, fillets or organic forms.
- Surface quality matters (visible parts, hand-held parts, prototypes for a client).
- The print is large enough that the variable thickness gives measurable time savings.
It doesn''t make much sense when:
- The model is mostly vertical (boxes, frames, mechanical parts with flat sides) — no steps for a thinner layer to fix.
- You''re making a functional prototype where only the dimension matters, not the look.
- You''re using a material that doesn''t like thin layers (some flexible filaments have a minimum below which extrusion becomes unstable).
WHAT TO WATCH OUT FOR
A few things I learned across projects:
1. Check the minimum/maximum layer height for the nozzle you''re using. The rule of thumb is roughly 25%–75% of the nozzle diameter. For a 0.4 mm nozzle that means 0.1–0.3 mm. Going below 0.08 mm with a 0.4 mm nozzle rarely makes sense — extrusion gets too fine and you get gaps.
2. Always leave the first layer fixed (usually 0.2 mm) for adhesion. Adaptive kicks in above it.
3. With fibre-filled materials (PLA-CF, PETG-CF, ASA) mind the temperatures. When the slicer changes layer height, the material flow per unit time changes too — on thin layers flow can drop enough that the hotend starts overheating the filament. Drop the temperature by 3–5 °C if you see stringing on the slow sections.
4. Ironing is a separate tool and does not replace adaptive layer height. Ironing smooths horizontal top surfaces; adaptive layer height smooths slopes. For a project with both — use both.
5. If the slicer offers manual variable layer height (not just automatic), you can paint in where you want thinner layers yourself. Useful on models where the algorithm doesn''t nail it.
TAKEAWAY
Adaptive layer height isn''t a marketing gimmick. It''s the only reason the specific part in the photo looks smooth on that angled top surface with no post-processing — no sanding, no coating, straight off the printer. For anything with a bevel, a dome or an organic form, this should be the first setting you turn on.
If you''re printing something similar and the rough slope is bugging you — get in touch, happy to look at the file and suggest settings.